Downgrading the iPhone 5C to iOS 6
A guide for tether downgrading the iPhone 5C to iOS 6
Note:
When you see angle brackets (< >), they indicate placeholders. Do not include the brackets themselves in your input. For instance,<enter>means press the Enter key, and<default value - 4>means you should input the default value minus 4.
Disclaimer
I am not responsible for any damage to your devices caused by following this guide. Please proceed with caution and at your own risk.
Credits
- NyanSatan for the 32-Bit iOS Dualboot guide and fixkeybag
- throwaway for telling me how they booted iOS 6 on the iPhone 5C
- libimobiledevice for irecovery
- LukeZGD for Legacy iOS Kit
- dora2ios for ipwnder_lite, xpwn (Note: This is a fork of multiple forks; go to the repository to see who made the original and other forks) and iBoot32Patcher (Note: Original by iH8sn0w)
- Darwin on ARM Project for image3maker
Prerequisites
- A macOS system
(You can also do this on Linux, but this guide will be focused on macOS.) - IDA Pro for patching the kernelcache
- An iPhone 5 6.x iPSW and an iPhone 5C 7.0 iPSW
(You can get these from The Apple Wiki.) - gnu-tar to compress the RootFS
- fixkeybag for generating the system keybag
- irecovery to send bootchain components
- Legacy iOS Kit for the SSH ramdisk to install the iOS 6 RootFS on the device
- ipwnder_lite to put the device in pwndfu mode
- image3maker to repack images into an img3 container
- iBoot32Patcher to patch iBoot components
- xpwn for xpwntool and dmg
(We will use xpwntool to decrypt and repack some firmware components, and dmg to decrypt the RootFS.)
Preparations
- Decrypt the RootFS DMG:
From your iPhone 5 6.x iPSW, usedmgto extract the encrypted filesystem. (Get firmware keys and file names from The Apple Wiki).1
dmg extract encrypted.dmg extract.dmg -k <key> - Convert to UDZO format:
1
dmg build extract.dmg udzo.dmg
- Mount the DMG:
Take note of the mount point.1
hdiutil attach udzo.dmg
- Enable ownership:
1
sudo diskutil enableOwnership <mountpoint> - Create a tar from the volume:
1
sudo gtar -cvf fw.tar -C <mountpoint> .
Partitioning
- Boot the SSH Ramdisk:
Enter DFU mode on your device and run Legacy iOS Kit:1
./restore.sh
Navigate to Other Utilities > SSH Ramdisk and enter 11A470a for the build number. Follow the steps to boot the ramdisk, then select
Connect to SSH. - Partition the disk:
Once in the ramdisk, run the following:1
gptfdisk /dev/rdisk0s1
- Delete existing partitions:
1
d <enter> 1 <enter> d <enter>
- Create new partitions:
1
2
n <enter> 1 <enter> <enter> 524294 <enter> <enter>
n <enter> <enter> <default value - 4> <enter> <enter>
- Rename the partitions:
1
2
c <enter> 1 <enter> System <enter>
c <enter> 2 <enter> Data <enter>
- Write the new partition table:
1
w <enter> Y <enter>
- Create filesystems:
1
2
/sbin/newfs_hfs -s -v System -J -b 4096 -n a=4096,c=4096,e=4096 /dev/disk0s1s1
/sbin/newfs_hfs -s -v Data -J -P -b 4096 -n a=4096,c=4096,e=4096 /dev/disk0s1s2
Extracting RootFS
- Mount the new partitions:
1
2
mount_hfs /dev/disk0s1s1 /mnt1
mount_hfs /dev/disk0s1s2 /mnt2
- Extract the RootFS tar over SSH:
On macOS, open another Terminal window and run:1
cat fw.tar | ssh -p 6414 -oHostKeyAlgorithms=+ssh-dss root@localhost "cd /mnt1; tar xvf -"
Note: When asked for a password, enter “alpine”.
- Move files to the Data partition:
Back on your device, run:1
mv -v /mnt1/private/var/* /mnt2
- Edit fstab:
Back on macOS, create a new fstab file to use the new partitions:1
nano fstab
Paste the following content:
1
2
/dev/disk0s1s1 / hfs ro 0 1
/dev/disk0s1s2 /private/var hfs rw,nosuid,nodev 0 2
- Send fstab to the device:
1
scp -P 6414 -oHostKeyAlgorithms=+ssh-dss fstab root@localhost:/mnt1/private/etc
Note: When asked for a password, enter “alpine”.
- Install fixkeybag:
1
scp -P 6414 -oHostKeyAlgorithms=+ssh-dss fixkeybag root@localhost:/mnt1
Note: When asked for a password, enter “alpine”.
- Configure launchd:
Createlaunchd.confon macOS:1
nano launchd.conf
Enter the following contents:
1
bsexec .. /fixkeybag
Send it to your device:
1
scp -P 6414 -oHostKeyAlgorithms=+ssh-dss launchd.conf root@localhost:/mnt1/private/etc
Note: When asked for a password, enter “alpine”.
- Finalize permissions and reboot:
Back on the device, run:1 2 3
chmod 755 /mnt1/fixkeybag umount /mnt1 /mnt2 reboot_bak
Patching Boot Components
Note:
I will not patch boot files for you, please do not contact me for this.
iBSS and iBEC
- Decrypt iBSS and iBEC:
Use your iPhone 5C 7.0 iPSW files:1 2
xpwntool iBSS.boardconfig.RELEASE.dfu iBSS.raw -iv <iv> -k <key> xpwntool iBEC.boardconfig.RELEASE.dfu iBEC.raw -iv <iv> -k <key>
- Patch the files:
1
2
iBoot32Patcher iBSS.raw iBSS.patched --rsa
iBoot32Patcher iBEC.raw iBEC.patched --rsa -b "-v amfi=0xff cs_enforcement_disable=1"
- Pack into img3 containers:
1
2
image3maker -f iBSS.patched -t ibss -o iBSS.img3
image3maker -f iBEC.patched -t ibec -o iBEC.img3
DeviceTree
- Decrypt DeviceTree:
Use your iPhone 5 6.x iPSW file:1
xpwntool DeviceTree.boardconfig.img3 devicetree.img3 -iv <iv> -k <key> –decrypt
Kernelcache
- Decrypt and decompress the kernelcache:
Use your iPhone 5 6.x iPSW file:1 2
xpwntool kernelcache.release.boardconfig kernelcache.dec -iv <iv> -k <key> –decrypt xpwntool kernelcache.release.boardconfig kernelcache.raw -iv <iv> -k <key>
Open in IDA Pro:
Open your decompressed kernelcache in IDA Pro. Ensure your settings match the image below: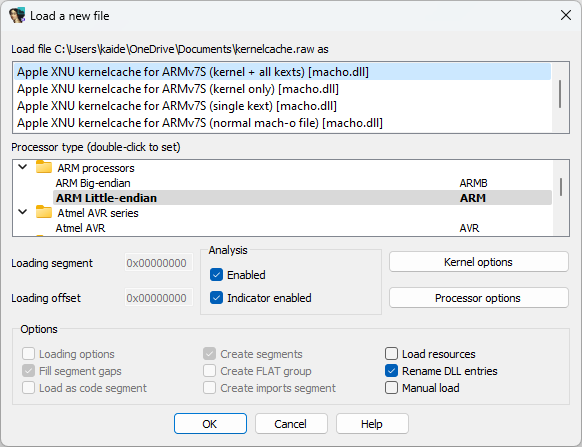
Note: If you get any extra windows just click OK.Analyze the file:
Navigate to Edit > Select all, press C, then click Analyze.
Note: This may take up to an hour. If it asks “Undefine already existing code/data?” click Yes.- Patch “could not find system ID”:
- Navigate to Search > Text… and search for
could not find system ID. You should see the following function:
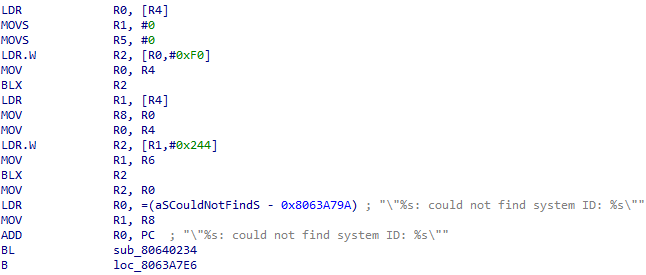
Place your cursor just before
BLand switch to hex view.
Press F2, type
00BF00BF, and press F2 again. This replaces the highlighted bytes with NOPs.
- Navigate to Search > Text… and search for
- Patch “XIP is still set”:
- Switch back to IDA view.
- Navigate to Search > Text… and search for
XIP is still set. You should see the following function:

Place your cursor just before
BLand switch to hex view.
Press F2, type
00BF00BF, and press F2 again.
- Apply patches and repack:
- Switch back to IDA view and navigate to Edit > Patch program > Apply patches to input file….
- Leave default settings and press OK.
- Repack the kernelcache:
1
xpwntool kernelcache.raw kernelcache.img3 -t kernelcache.dec
Booting the Device
- Put the device in pwndfu mode:
1
ipwnder_macosx
- Send bootchain components:
1
2
3
irecovery -f iBSS.img3
irecovery -f iBEC.img3
irecovery -f devicetree.img3
- Execute DeviceTree:
1
irecovery -c devicetree - Send and boot Kernelcache:
1
2
irecovery -f kernelcache.img3
irecovery -c bootx
Done!